Just a few pictures from the bread I’ve been baking recently. Found a good blend and method for getting a decent rise and great sandwich bread, and a really fun scissor slash.
Here are the highlights:


One recipe worked very well (and was used for the “pinwheel” scissor slashed loaf) for sandwich bread. This recipe makes one robust loaf of close-crumbed bread with oats, fresh milled red winter wheat berries, flax seed, honey and (a hefty amount of) sourdough starter. A little active dry yeast is added to boost the rise as the bread is somewhat dense due to its high whole grain ratio. The fresh milled wheat berries and flax seed with the honey give it a slightly grassy, almost fruity flavor and the crust is nice and crisp. The honey also “supercharges” the yeast and sourdough starter for an additional boost to the proving stage.
Oat, flaxseed, fresh ground wheat and honey whole grain sandwich loaf
The whole grain mix:
130g oats
130g wheat berries
30g roasted flaxseeds
Combine above and grind to a fine flour in a food processor with a milling head.
The rest of the dry mix:
8g gluten powder
230g AP flour
½ tsp yeast
10g salt*
Wet ingredients:
about 290g warm (80-100ºF) water**
180g sourdough starter
@ 30g raw honey
*optionally, leave the salt and set aside about 20g of water to work into the dough after the autolyze.
Combine all dry ingredients in a bowl with the gluten powder and AP flour and add the salt*. Mix together and add the ½ tsp yeast.
Warm water to about 82ºF and combine with the sourdough starter and honey in a quart jar. Mix until the honey dissolves then mix into the dry ingredients until well combined and the dough comes away from the bowl. Scrape bowl well. Leave to autolyze for 20-230 minutes.
*if adding the salt after the autolyze, work it and the 20g warm water into the dough until well combined. (leave a further 20 minutes if adding the salt at this point for the dough to slacken a bit before kneading).
** If working in a dry climate, you may need to add a little additional warm water (20 to 30g more) – just add enough for the dough to come together and pull away from the sides of the bowl.
Turn dough out on lightly floured surface and work until pliable and soft. (if dough seems very tight and not sticky you can use oil to work instead of flour, if dough is very sticky and wet, flour will help a little. Dough will be slightly heavy and dense, work for at least 10 minutes or until it begins to get smoother. If the dough becomes difficult to work (starts tearing a lot) let it sit covered for 20 minutes to rest then work again until smooth and soft. This dough will not become really pliable even with added gluten, due to the high amount of whole grain, and working it too long may actually make the crumb too dense. A longer rise after the working is key to this bread.
Oil dough and place in bowl to sit covered (I use a proving bag for all stages where the dough is covered) until roughly doubled in size.
Pre-form by stretching and folding the 4 sides in and leave for at least 20 minutes.
Form dough to banneton or oval specifications and let sit for another 20 minutes then turn dough over and pull toward you to tighten up the shape.
Flour the banneton (using rice flour – which you can mill from rice or purchase as flour – on the bare wood of the banneton works well if you want a nice ring pattern on the bread) and place the dough smooth side down, then cover with towel or place in proving bag and leave out to rise for at least another 2-3 hours. At this point, refrigerate to slow bulk ferment and leave overnight, or until dough rises in fridge, for better flavor.
When nearly (1-2 hrs from) ready to bake preheat oven to 450º F with combo cooker in oven. Leave to preheat for 1 hr at 450º F before removing dough from banneton and placing in cooker.
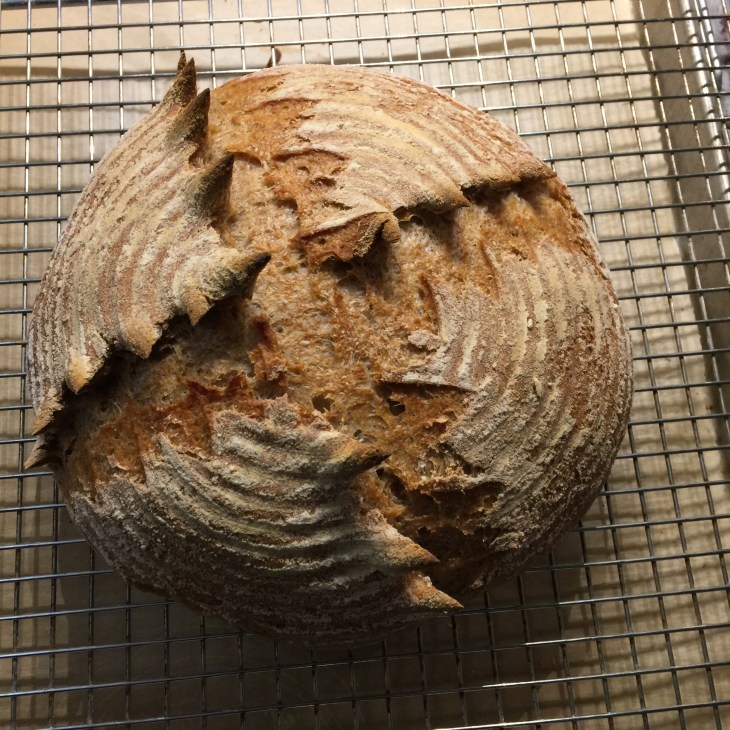
To achieve the scissor slash shown, snip at a shallow 15º angle to the dough across the middle from edge to edge and repeat in an “X” across the dough at 90º to the first slash. You could enhance the pinwheel effect by making the slashes halfway across from one side at the 15º angle angled to the right side halfway across and angled to the left side on the other half of the line across the middle of the loaf. I did this quickly after placing the dough in the combo cooker shallow griddle side so as not to let the dough slump too much before placing in the oven and covering with the deeper dutch oven side of the cooker.
Note: I have been baking with three layers of foil in the heated griddle side of the cooker and 2 layers of parchment between the foil and the bottom of the loaf. This results in a deep brown (a bit over-browned) bottom crust. I will add a 4th layer of foil in future to see if this helps with this slight problem.
Bake for 30 to 35 minutes with dutch oven top on, then remove top and bake 5 to 10 minutes more until internal temp is about 210º F and outside is a deep golden brown. Remove from oven, move loaf to cooling rack and let cool completely on wire rack before slicing.
