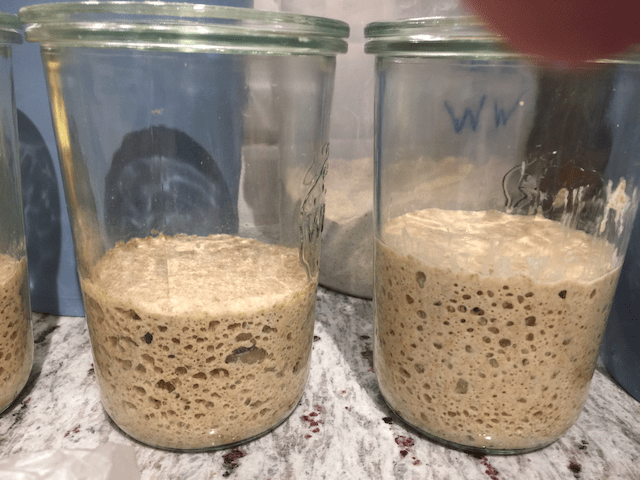
My latest bake was a slight adaptation of Maurizio Leo’s (of The Perfect Loaf) sourdough bread recipe for beginners. I made a half recipe (1 loaf) and substituted 30g more Whole Wheat and Rye flour for 60g of the AP flour and added 10g gluten to help with the texture and rise. My starter is a fairly mature (18 months old so a baby by many standards) base of stoneground rye flour and water instead of AP or stoneground whole wheat flour (because it works better and makes big C02 bubbles, and fast, so it’s the one for my “microclimate”). My levain (that is French for “starter” if you wondered) is 40 to 50g each starter, rye flour, and water, left for about 4 hours or until it domes and has big bubbles. I use around 90g of the levain for one loaf. The rye flour makes a fairly thick starter which is fine for this recipe.
Instead of mixing the flour with water and letting it autolyze on its own before adding the levain, water and salt, this time I put the levain in with the majority (about 300g) of water and distributed the levain in the water evenly then mixed in the flour, working the salt and remaining water (about 45g) into the dough after a 2 hour autolysis. If you look up the word autolyze / autolyse in a dictionary its definition is essentially self-digestion, where enzymes act to break down plant (or animal) tissue. Which is why this biochemical process is great for breadmaking! Not only does the autolyze period hydrate the flour, it starts the process that gets the gluten ready for the next steps. I think that extra 2 hours of fermentation time during autolysis helped the dough really get started. That said, you can add the levain, salt and remaining water after autolysis if you like.
I use a fairly inexpensive 6 quart dutch oven that states 400º F max but has not shown any problems up to the oven’s displayed 475º F (but I know that overstates the actual oven temperature so I recently got an in-oven thermometer to see how accurate the oven temps actually are. My first test revealed that the oven set to and registering 450º f is only about 420º F after the temp maxes out, so I will up the temperature on my next bake to get as close to 450 as possible). With the oven pushed to my oven’s max of 500º F (likely somewhere between 450 and 475º F) but maybe not with this particular dutch oven, I would probably get a better oven spring and browning, but as set to the oven’s 475º setting the bread bakes well enough and the dutch oven hasn’t shown any visible damage over a year and a half’s use. (I am researching this to find out if cooking with a higher than rated temp is risky, and why)…I let the dutch oven and its lid (set next to the dutch oven on the rack) come up to temp slowly then preheat for an hour after the display shows 475º F before pulling the dough from the fridge.
This particular dutch oven is fairly thin so it often over-bakes the bottom of the bread. I compensate for the thin bottom by lining it with two round sheets of aluminum foil, plus a piece of parchment typically from the previous bake, cut round to fit and set over the foil. I re-use the foil but pull it out before preheating the dutch oven and replace the parchment round when it gets too cooked. I’ve forgotten to insert the foil and parchment before placing the dough inside, so it’s good to know that sitting the hot dutch oven on top of the 2 layers of foil also works. I leave the extra parchment round out if I’ve made this slight error.
When the oven is ready, I pull the dutch oven out and carefully reinsert the foil and parchment (I use oven mitts) into the preheated dutch oven and take the risen dough out of the fridge. Usually the cold proving period is 12 to 18 hours, but can be longer for more complex flavor. It is hard to over-prove a whole grain loaf as it takes longer to rise and I have left dough in as long as 24 hours so far with good results.
As soon as I pull and line the dutch oven, I use a square piece of parchment the width of the parchment paper (15 inches) to cover the dough when it comes out of the fridge . Since I don’t have a baker’s peel, and the dutch oven is not possible to use like a “combo cooker” that has flat top and bottom so it can be flipped to ease the dough into the lid and the deep pot set over it) I use a cooling rack flipped over atop the parchment and flip the dough with one hand firmly on the bottom of the banneton and the other in the middle of the cooling rack, then slash the dough with a sharp bread knife (usually in the cross pattern which always gets good results) then pick up the slashed loaf using diagonal corners of the parchment and transfer it into the preheated dutch oven. Using oven mitts (my favorites are the longer silicone versions which protect against forearm burns) I set the dutch oven back in the oven and place the preheated top on the oven and let the bread bake for 25 to 35 minutes before removing the top, turning the heat down to 450º F, and letting the loaf brown until it reaches a temp of at least 209º F inside. This loaf baked for 35 minutes covered, and 15 minutes uncovered, with a final internal temperature of 210º F.
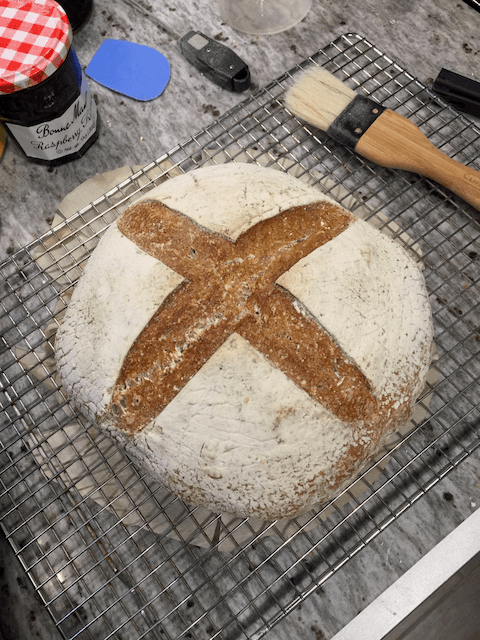
Loaf turned out quite nice if a little too floury from very liberally flouring the banneton liner, which made the cross-loaf slashes really stand out but didn’t result in a darker crust. I probably could have got a darker crust (and a less photogenic darkening of the excess flour) by removing the lid after 25 or 30 minutes but I was happy with this result. After brushing off what excess flour I could and letting the loaf cool sufficiently I sliced it clean down the center to see how the crumb looked. For whole-grain sourdough it had a nice spring and an open enough crumb with lots of larger air pockets.
I like my bread with a fine enough crumb to hold (at least most of) the butter so this was good – some butter is bound to leak through as the rise creates lots of open space, but oh what lovely toast it made, with the rye and wheat whole-grain earthy flavor really coming through. I could have let it stay in the fridge for several more hours to develop the sourdough flavor but I had no complaints about this loaf. It’s soft, with a crunchy crust when toasted. The loaf will last through the week for me and I’ll start another on Friday.
Crumb is indeed important… but whether your bread comes out with a really airy crumb or closer crumb like mine, Maurizio’s Beginner’s Sourdough Bread recipe is a great way to bake reliably good sourdough bread.
